How do you unlock the hollow doors in the Alone in the Dark Chapel? The best horror survival games are filled with complex puzzles and conundrums – after all, a jump scare just wouldn't be the same if you didn't have to spend ten minutes unlocking the door in front of it first. As you explore Derceto Manor in Alone in the Dark, and another world entirely, there are plenty of brain-teasers to keep you distracted from what might be creeping around you.
Among the most terrifying locations in the Alone in the Dark has three separate doors that must be unlocked with gold medallions – very Resident Evil. To get these hollow doors open as quickly as possible, and avoid being devoured by monsters, here's where to find each of the Alone in the Dark chapel medallions and how to arrange them.
Alone in the Dark medallion door one
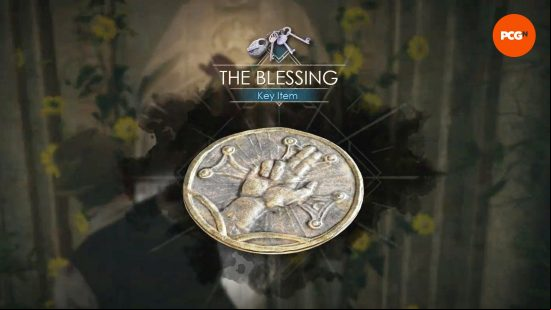
The first medallion, The Blessing, is located just to the left of the first door. Place this in the hollow door, marked with a triangle, so that the fingers are pointing up.
Beware the mutated skeleton that jumps out at you once you head through the door, and make your way up the stairs to another hollow door, this one with three medallion slots. This is actually the third door, and you need to take the path to your left to find your way to the second medallion and door.
Follow the path through the water and into the graveyard to a crack in a wall. The courtyard is full of monsters, both resting and awake. You can choose to creep around the sleeping ones, but it might be best to take them out as soon as you see them, since any noise you make fighting others can alert them, and you'll soon be overwhelmed.
Follow the path through the water and into a courtyard with a door on every side. The two doors on your left and right are connected via the crypts underground.
Alone in the Dark medallion door two
The second medallion, The Omen, is located in the crypts. Take either door on your left or right in the courtyard, and follow the path until you see the medallion on a statue.
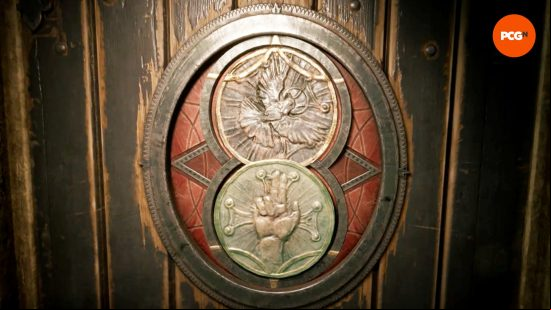
Once you've fought off the monster waiting for you above ground, go through the now-open fourth door, go underground, and place this and The Blessing in the hollow door.
The Blessing goes in the bottom slot, matching the triangle marking from the first door, and The Omen goes at the top. For orientation, match the curved lines on the medallions to the marks on the edge of the slot. This leaves the fingers pointing up, and the bird's head two notches to the right, as per the image below.
From here, we'll warn you, you're swarmed by monsters in a very narrow underground tunnel. If you struggle, our advice is to use your dodge to get through them with as little damage as possible, and run to the end of the tunnel – don't bother trying to kill them. When you reach a gate, which is also an auto-save point, rocks crash down behind you, preventing them from following you.
Alone in the Dark medallion door three
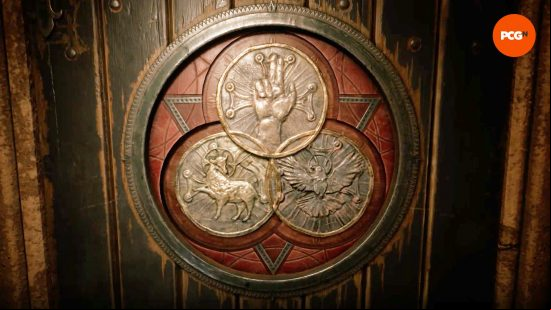
The third medallion, The Sacrifice, is located in the candle-lit area once you are through the corridor of undead. Following the path above ground, you'll find yourself back at the hollow chapel door, where all three medallions must be placed.
This time, all medallions need to be orientated the right way up, their order decided by the same curved lines we used on the second door. However, they must now all follow the curves of the other coins. This leaves The Blessing at the top, The Omen on the bottom right, and The Sacrifice on the bottom left, as per the image below.
You'll have already solved many puzzles to have made it to these Alone in the Dark medallion locations, but there are plenty more ahead of you in the survival game, something we discuss in our Alone in the Dark lagniappe collectibles to unlock the full story.


